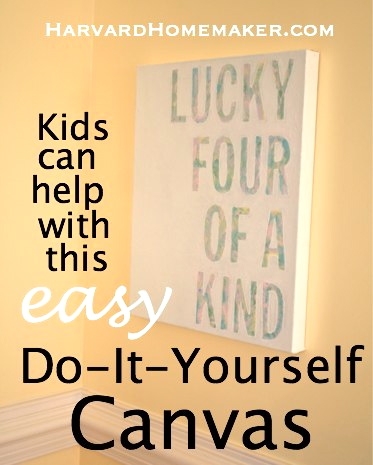
My girls and I worked on this project one rainy Sunday, and it only took us a few hours to complete it! I really love art with favorite sayings or words that are meaningful in some way, so we decided to give it a go ourselves! It was so easy–I am inspired to try all kinds of different variations now… I’ll be sure to share any other canvas art we decide to make!
Here is the step-by-step:


Start by painting a canvas at random. I divided ours into four parts, and I let each daughter paint her own section. (I really painted our one-year-old’s portion myself, but her sisters wanted her to be included, too, with her own strip!)
We chose to use paint we already had–they are actually our daughters’ bedroom colors and the same colors the girls and I used to paint the chairs in this post.

After the girls were done painting, I blended the four sections together a bit.

I then divided the canvas into four equal sections once again because I knew I wanted to use four lines of text. (I happened to buy a canvas that was 20″ long, so I was able to easily divide the canvas into 5″ portions. That was a total accident on my part, but I lucked out that it worked out that way!)
After measuring up 5″ on each side, I used a level to draw a straight line from side to side.

I decided to cut my stickers apart as shown below so I could play with the design. After trying to center all the letters, I ultimately decided to line things up with the right edge of the canvas. I did this, in part, because I liked how it looked–but let’s face it, it was also a lot easier this way because I didn’t have to make sure each line was centered!

I started with the last letter in each line to make sure things were spacing out well.

I decided to separate each letter by 1 cm because it was easy to see on the ruler! :) It also seemed like a good spread to keep things visually appealing.

Ta-da! We always tell our girls that they are our “Lucky Four of a Kind,” so that’s what we chose to spell out on our canvas.
I actually like what it looks like at this point, too, just with the stickers on top of the paint! You could easily stop here with your canvas, although if you look closely, you can tell that the letters are stickers. But if that doesn’t bother you, your canvas could be complete like this! Your background could be random like ours here, or you could have painted stripes, a chevron pattern, a simple solid, etc… so many options! You could also take wooden letters and spray paint them white–and then simply glue them on your canvas for a three-dimensional look.

My original plan, though, was to spray paint the entire canvas and then peel off the letters, so that’s what we did.
* One thing I would do differently next time:
I would paint more lightly with layers and let them dry in between. But being the impatient person that I am when it comes to things like this, I was going to get ‘er done in a hurry, so I just sprayed the crap out of that thing all at once. MISTAKE. I made the canvas so wet that the letters started to peel back as it dried, and paint ended up seeping beneath the stickers.

I went out into the garage a few hours later, and this is what I found. The letters were starting to peel–dang it!!

As I peeled the letters off, I realized some paint had seeped in here and there, and I was afraid the whole project was going to be a waste at that point. But in the end, I decided that it still looked good (especially from far away)–it just needed a bit of fine tuning to clean it up!

Here was the result immediately after peeling off the letters–not awful, but I thought it could be neater.

I chose to sand the entire canvas pretty thoroughly to smooth out some of the texture left by the paint layers and to distress things a little.

I then took a paint pen and outlined each letter. That helped to define the letters where the paint had seeped in.

The edges aren’t so blurred anymore–this feels better to me now that the letters are outlined. You could skip this step if your stickers peeled off more neatly.

Here’s a shot of the finished product. I think it’s pretty cute for an afternoon’s work! There are so many ways you could do this with various backgrounds…


What DIY art have you made? I am inspired to try more canvas ideas–I have a feeling I could become obsessed with making these!


where did you get those stickers? I am trying to make one, but I ended up using cardboard letters and sticking them on with a non permanent adhesive….stickers would be easier!
I found mine at Michael’s. They were near the paint and canvases. I would think most craft stores would have them. You might also be able to find some near the “For Sale” type of signs at a Home Depot or Lowe’s maybe?