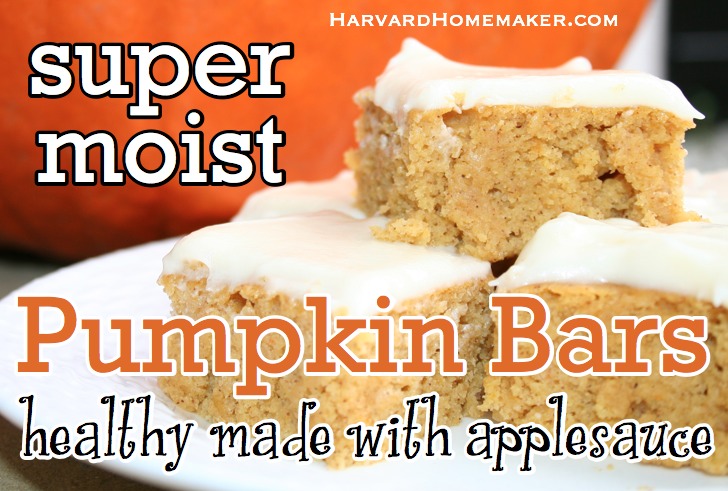
If you love pumpkin bars, look no further–this recipe is for you! My aunt gave me the original recipe, and then I modified it. I took out an entire CUP of oil, and I also replaced the four eggs it called for with egg beaters. You will never know the difference–I promise.
At Thanksgiving one year, my aunt and I actually both brought these to share–although she had used the original recipe, and I had used this healthier version. Everyone (even my aunt!) agreed that the modified recipe was the winner, hands-down! You will not believe how moist these are… give them a try!
FIND THE COMPLETE RECIPE AT THE BOTTOM OF THIS POST.

Next mix in all the dry ingredients. Typically recipes ask you to mix these separately in another bowl and then add them to the wet ingredients. That means I’d have to wash another bowl, and that’s just crazy talk. I usually put the dry ingredients right in with the wet ones and stir things up a bit by hand before I start with the mixer. The end result always seems the same to me whether or not I mix the dry ingredients first in a separate bowl. So I usually skip that step.

Mix well for about 2-3 minutes and pour into a large pan with sides. I use an insulated pan that is approximately 15×10.

When I bake, I find that I have much better luck with insulated pans. They are made with double layers of metal with air between them. This allows the heat to move evenly throughout the pan before it moves to the food–this eliminates hots spots and results in more even cooking. (I find it especially important to use insulated pans when baking cookies.) If you look closely in the photo below, you can see how the pan is thicker than typical metal baking pans.

Bake at 350 in a preheated oven for approximately 25 minutes. Remove from the oven when the center bounces back up when you touch it lightly. Also, if you jiggle the pan a bit, the mixture shouldn’t move. If it’s still shaking in the middle, it’s probably not quite done.

As bars are cooling, you can mix up the frosting. * Careful not to over-mix! My husband and kids made these once for my birthday, and the frosting came out very runny. Never one to “under-do” anything, my husband beat the crap out of that frosting and managed to bring the butter back to its liquid state! When you over-mix, the butter begins to separate–basically, it’s melting. You don’t want that.

Frost bars once they are completely cool. I do store the bars in the fridge because otherwise the frosting seems to “melt” after a while. If you think you will be eating these within about 24 hours and don’t want cold bars, you can store them at room temperature. And let’s be honest, usually these don’t last 24 hours!

Click here for a printer-friendly version of the recipe below.
HEALTHY PUMPKIN BARS
1 cup egg beaters (the equivalent of 4 eggs)
1 2/3 cup sugar
1 cup applesauce (I usually use 2 small containers that I always have on hand for my kids’ lunches… probably just shy of 1 cup but close enough!)
2 cups pumpkin (I use one 15 oz. can… probably just over 2 cups, but again–close enough!)
2 cups flour
2 t. baking powder
2 t. baking soda
2 t. cinnamon
1 t. salt
FROSTING
5 oz. 1/3 fat cream cheese, softened (leave out of fridge for a while)
1/2 cup butter, softened (leave this out of fridge for a bit, too)
1 tsp. vanilla
2 cups powdered sugar
Preheat oven to 350 and remove cream cheese and butter from the fridge so they can begin to soften. Mix together egg beaters, sugar, applesauce, and pumpkin. Beat well. Add flour, baking powder, baking soda, cinnamon, and salt. Stir by hand for a bit to mix in dry ingredients and then beat well for about 2-3 minutes. Pour into baking sheet with sides–my pan is about 15×10. * I recommend using an insulated pan if you have one. (I do lightly spray the baking sheet with Pam, but I’m not sure if this step is truly necessary… I’ve just always been afraid to skip it!) Bake for about 25 minutes or until the center springs back a bit when you touch it lightly. (You can also test for doneness with a toothpick–it should come out clean.)
Mix all ingredients together for the frosting. * Careful not to over-mix or the butter will separate and the frosting will be runny. Spread evenly over bars. Store bars in the refrigerator if you will not be eating them all within about 24 hours.

I hope these became a fall favorite in your house! Let me know how it goes!
What recipes have you successfully modified? Please share your ideas!
If you’d like to keep up with me and my blog (I’d love that!), please follow along via Facebook, Pinterest, Twitter, Instagram, Google+, or you can sign up for my monthly newsletter in the footer of my site! :)






I absolutely LOVE these, will make them every fall season!
Do you think these could also be made with a sugar substitute? denise
I have never tried it, but it’s worth a shot! I often remove oil and replace with applesauce or Greek yogurt, but I don’t have a lot of experience using sugar substitutes. If you try it, I’d love to know how it turns out! :)
Do you recommend egg substitute over liquid egg whites?
I’ve never tried it with egg whites, but I would think that would be fine as well?! I just happened to use Egg Beaters the first time I modified the recipe and it worked out so well that I’ve been afraid to mess with it. Please let me know how it goes if you try it! :)
These are SO good! I’ve found that I can reduce the amount of sugar by using 1/2 c. miniature chocolate chips, 1/2 c. sugar, 1/4 c. truvia/stevia – you don’t even miss the icing! My friends love these :) Thank you for the recipe!
Love this variation you came up with! I definitely want to try it. Thanks so much for sharing!! :)
Did you ever bake these as muffins or mini muffins (without the frosting)? I’m looking for a healthier muffin recipe and this sounds like it could work!