This Halloween costume idea is simply genius. I can say that because I didn’t come up with it; my super-creative friend did! Last fall, two of my daughters and a few of their friends all decided they wanted to be “Minions” together (from the movie Despicable Me). We moms searched and searched for a good costume that we could simply buy and be done with it, but they were all pretty expensive, and honestly, they were terrible.
And then my friend came up with this awesome idea and told us how to do it. When I made my girls’ Minion costumes, I took pictures along the way so I could share the tutorial with all of you. (I had only been blogging for a week back then! Time flies!) It really was so easy. You just need to allow some time to let the paint dry in between steps. And it cost very little–I spent maybe $10-15 or so. You might even have much of what you need!
See below for the step-by-step. This costume idea might even be more relevant this year since Despicable Me 2 came out this past summer. Can you imagine how funny it would be if you had a whole mess of kids out trick-or-treating as a group of Minions?! Love it! (By the way, the kiddos below won their fair share of “Best Costume Contests” last year. Just sayin’!) :)
Disclosure: Some links in this post are affiliate/referral links. Please click here for further explanation.
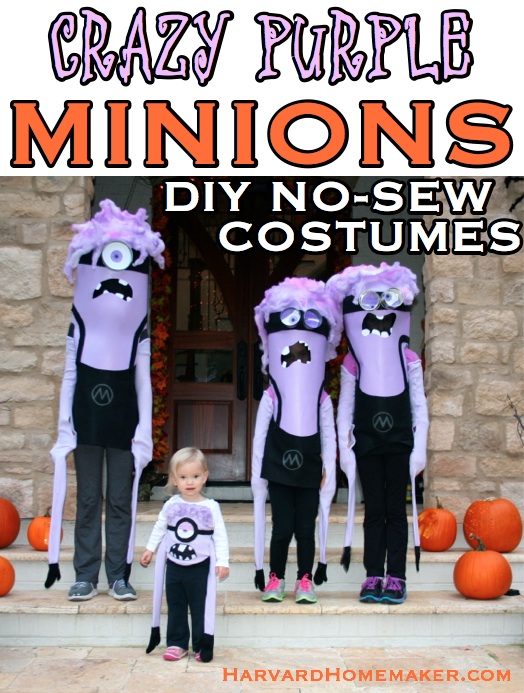
WANT TO MAKE THE CRAZY PURPLE MINIONS?
Click here or on the photo below for that tutorial (very similar to this one!)
WANT TO BUY COSTUMES INSTEAD?
If you know there is no way on God’s green Earth that you are going to be making these (!), here are some links where you can order costumes and call it a day! :)
Find all types of Minion Costumes here.
Find a Child’s Minion Costume here (overalls style).
Find an Adult Minion Costume here (overalls style – matches the style above).
Find a Minion Costume for your DOG here (LOL!!).
How awesome is this Adult Gru Mask (see below) – the perfect final touch! *Update: I have found that this typically sells out every Halloween, so I would suggest you go ahead and order it if it’s available and you really want to add a “Gru” to your clan! (A great job for Dad!) :)
Adult Despicable Me Gru Mask – $15.99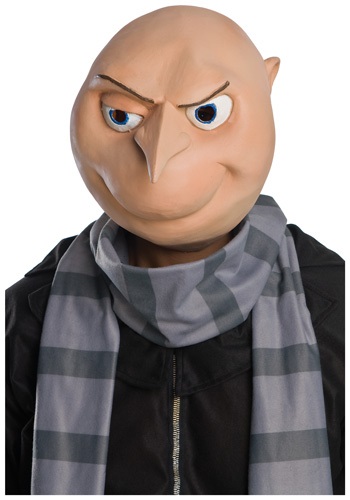
from: HalloweenCostumes.com
DRESSING A TODDLER FOR HALLOWEEN THIS YEAR?
Don’t miss this post: 10 Things to Consider Before You Put Your Toddler in that Halloween Costume!
SUPPLIES NEEDED
This is all you need… basic supplies you either already have or can find easily:
– A wide, shallow bowl (I found mine at Dollar Tree)
– Piece of poster board, large size (or large enough to wrap around torso; you might need a strip from a second poster board, so perhaps you want to get 2 at the store to be safe)
– Yellow spray paint (plan for about 1 can per Minion)
– Packing tape and/or duct tape
– Drill
– Yarn or pipe cleaners for hair
– Fabric for clothes (I think I bought about 1 yard per Minion)
– 2 large black buttons (or paint some black)
– Black Sharpie to draw logo on overalls
– Supplies for eyes (cans, lid from a jar, cut an oatmeal container, etc.)
– Glue gun (handy if you have one… used for attaching the clothes)
– Scissors and/or box cutter for cutting arm holes and mouth
– Fabric scraps or old socks to create shoulder straps inside for comfort
– Spray-on Polyurethane (optional… to keep paint from scratching off bowl over time)
– Black tulle fabric or similar (optional… to cover mouth yet allow person to see through it)
You’ll also need your child to wear jeans, a long-sleeved yellow shirt, and black gloves.

#1. I started with a large candy bowl I got for less than $1. I then drilled some holes in the bottom of it.
(I underestimated how hard it would be to drill the holes–my drill was sliding all over the place, and I even cracked the bowl a bit. Oops. I guess I was trying to put a little too much muscle into it!! I’m never one to under-do much of anything…)
HELPFUL TIP!!! This year I’m making crazy purple Minions (!), and I realized that it’s a million times easier to drill the holes from the inside! I wish I had figured that out last year! Just flip your bowl over (so it’s actually right-side up as if you were going to serve something in the bowl) and drill into an old rug or some magazines to cushion it a bit. Piece of cake!

#2. Spray the living daylights out of that candy bowl with yellow spray paint.
(I made two Minion costumes, and between the two bowls and the two poster boards, I ended up needing two cans of spray paint. I also discovered that it helps if you rough up the bowl a bit with some sandpaper. That will help the paint adhere.)

#3. Spray paint a piece of poster board. I used a pretty large piece of poster board (sorry, I didn’t write down the dimensions last year). If you do need a little bit more room, just cut a piece from another poster board and tape it on the inside to the larger piece. To be safe (and to save yourself a trip back to the store), perhaps you want to have two pieces of poster board just in case.


#5. Secure the yarn. I originally just tied some knots, but the hair fell right out when I turned the bowl over. So then I taped them down as well. Worked like a charm.

#6. If you use yarn for the hair, pull the yarn apart to make the hair appear crazier! :)

#7. Wrestle with your poster board, show it who’s boss, and tape it to the bowl as best you can… this step isn’t pretty. I was glad no one was watching me do this!
On second thought, it might be smart to have another person help you do this part!

#8. Cut some arm holes. You might want to slide the contraption over your child first to get a sense of where you want to make the cut.

#9. Adjust the arm holes. I started with small holes, and then made them bigger as needed. You definitely need the holes to be large enough in the end so your child can get the costume ON. It can be a bit tricky to wiggle into it! We found that it’s easiest if your child holds her arms up, someone else slides the costume over her head, and then she pops her arms into the holes at once. (For a more detailed description with tips for getting it on and off, please see the comment section at the bottom of this post.)

#10. Figure out the height of your child’s eyes, and then cut accordingly. (Don’t try to make the cut with your child still wearing the costume, of course!!)

#11. To make the costume more comfortable, add some shoulder straps inside. I used old socks; my friends used some fabric scraps. We all secured them with duct tape.

#12. I found that the straps were sliding off my girls’ shoulders, so I also used some duct tape to hold the straps together across their backs. This seemed to really help, but you could do this step after-the-fact if needed; perhaps your child’s costume will sit fine without doing this.

#13. Create some teeth. I simply cut some printer paper quickly and added some lines with a pen.

#14. Tape in the teeth (from the inside), and cover the seam where the bowl and the poster board meet. I used black duct tape, but you could also use a glue-gun to secure some black fabric.

#15. Add some eyes with tape or a glue-gun (I used packing tape). Look around the house for anything that might work. I used the lid from a large plastic jar of almonds for the single eye, and for the two-eyed Minion, I used two small cans. (When making chicken chili, I was dumping in the chopped green chilies, and I realized those cans would make perfect Minion eyes!!) One of my friends cut a large oatmeal container to make an eye. We also just taped some white paper inside to create the white of the eye and then drew an eyeball (to match each daughter’s eye color, of course!).

#16. Time for clothes! I cut some blue fabric (I bought a yard per Minion I think… maybe 1.5 yards, and I still had leftovers), and I traced the “Gru logo” on the center of the overalls. Find the logo my friend created here–simply print it and then cut it out.
(Only now that I’m writing this post a year later do I realize that the logo I drew is upside down!! The little “stick” on the G should be on the bottom and not on the top–oops! Turn it over when you do it, people!!)

SEE BELOW FOR WHAT LOGO SHOULD LOOK LIKE.
(I accidentally traced mine upside down, and I’m only just realizing this a year later!) :)

#17. After tracing the logo, fill it in well with black marker. I used a Sharpie.
Note: Mine is upside down below. OOPS!!! Look at the Minion cartoon above for how it’s supposed to sit!!

#18. Attach the fabric to create the overalls and straps. I used a glue-gun for this. I then glued on some large, black buttons. (I couldn’t find black buttons, so I just painted some. This was the first time I had ever really done much spray-painting, and you kind of get addicted! After a while, it was like, “What else can I paint?!”)

Ta-da! MINIONS!
Tip: The yellow paint might start to scratch off the bowl over time, especially if your child wears the costume multiple times (to school, a Halloween party, etc.) To help prevent this, we did spray on some Polyurethane (found near the spray paint at stores). That seemed to help. This step isn’t necessary, though.

Other items needed: Jeans, a long-sleeved yellow shirt, and black gloves.
You could also add some black tulle fabric across the mouth. That will hide your child’s face but still allow him/her to see. I actually did that (but forgot to take a picture of that step), but the fabric wasn’t really dark enough. You can hardly even tell it’s there.
On two of the girls’ costumes, though (follow the arrows below), their mom took some tulle fabric that had a denser weave–she could only find white, so she spray-painted it black. Whatever she did, it worked! Look how well it hides her kids’ faces–I think it’s a great final touch for a fun costume!


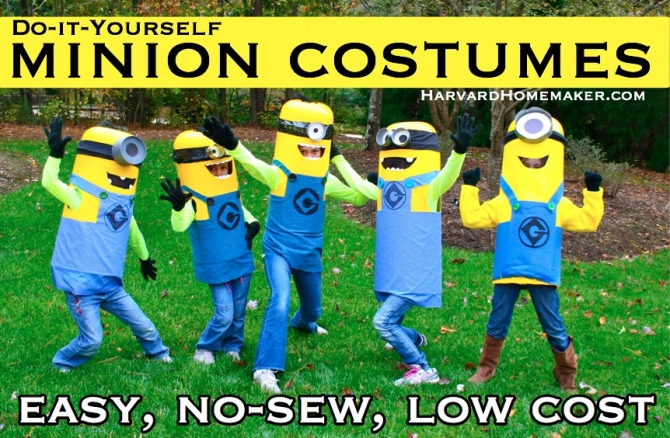

Hats off to my friend for this awesome idea! Love it! I hope you do, too.
Have a fun Halloween everybody! :) It will be here before we know it!
If you’d like to keep up with me and my blog, please follow along via Facebook, Pinterest, Twitter, Instagram, Google+, or you can sign up for my monthly newsletter in the footer of my site! :)










I clicked on the link to the Gru mask and it isn’t working. Bummer! I was hoping to see it! Do you have a picture you could add to this page instead? And perhaps the location for where to find the mask?
Hi Jenni! Not sure what’s going on with the link… I will check it out. You can find the mask here. Looks like it’s out of stock right now, though. :( Happy Halloween!
Super cute!
I just wanted to thank you for the minion costume instructions. I found others that were rather difficult to follow but yours were very easy and I made my grandson one for Halloween this year and I think it turned out great. The best part is that my grandson was very happy with it and I can’t wait to see him trick or treating in it in a few weeks.
Thanks again,
Jean
Hi Jean! Thanks for taking a quick moment to leave this note for me. I’m so glad you found the tutorial easy to follow! I think it’s such a fun costume idea–it certainly makes for entertaining photo ops, too! :) I’m sure your grandson will be a hit in his costume made especially for him by his grandmother! Sounds like a lucky boy to me… :) Take care and Happy Halloween!
I purchased the materials to make this for my daughter yesterday. I am going to try to make the girl minion, and paint the polka dot dress on the poster. She is super excited about it. Thanks for the instructions.
Great! So fun for me to hear that, Ashley! I hope it works out well for you! :)
Thank you so much for your very helpful and detailed instructions. I am planning to make one tomorrow for my 7yr old girl for her school costume. I just have one question though. How does your girls take off the costume? Do they have enough room to wiggle out from it with their arms on the sides? Other than that, amazing costume! It’s people like you that made us less artistic one’s lives easier! Thank you so much.
Jechell
Hi Jechell! Getting the costume on and off does take a bit of wiggling, and sometimes you do get a little ripping around the arm holes. My kids wore their costumes multiple times, and so by the time Halloween rolled around, we did have some tape going where it was ripping slightly. It’s definitely easiest if someone helps with getting the costume on. Here are some tips:
Getting it ON: Have your daughter hold her arms straight up. Pull the costume down over her head and hold it there (it’s only halfway on) while she has time to sneak her arms under the shoulder straps and into the holes. Then, in one gentle motion, pull it down the rest of the way while her arms fully pop out.
Getting it OFF: Slowly pull it straight up, and have her lift her arms naturally as the costume starts coming off. As you hold it up, she should be able to carefully pull herself down out of it. It can be easier to get it off than on! :)
Good luck!!! I hope it’s a big hit!
Awesome job and great instructions! I’m having a bit of trouble with the straps. Where exactly do they go? Just above the arm holes?
I think I figured it out! I am craft challenged but it doesn’t stop me from trying! Lol
Glad you figured it out! :) That part is a little tricky!
We just made the minion costume this past weekend!!! It was easy and fun but one suggestion that I may add. I found it easier to use a pliers to hold a finishing nail and heat the nail with a flame and then melt holes in the bowl to put pipe cleaners in. We cracked the first bowl while drilling. Otherwise, great instructions and super creative! Thanks for sharing!
Great tip! I’m actually in the process of making crazy purple minions for my kids this year, and I realized that if I just turned the bowl over, it was so much easier to drill the holes from the inside out!! I wish I had figured that out last year. (I should add that tip up in this post.) I have an old rug in my garage, so I placed the bowl on that, and then the drill just popped through into the rug as I drilled. It was a piece of cake!
Great idea!!! This is the only costume I’ve seen that closely resembles a minion without looking creepy!! I used pipe cleaners…making it possible to drill super tiny holes without worrying about cracking the bowl!!! The wires in pipe cleaners are super thin and personally I like the hair sticking up! Also the poster board was not long enough to go around the circumference of the bowl, I had to add a good 3-4 inch strip. I bought the EXACT bowl you have pictured here from dollar tree. Maybe they made the bowls a bit wider this year? Just a helpful tidbit because I know I really dislike going back to the store! ;) I’m very excited about finishing this! :)
I know, me too! :( I’m sorry! I must have ended up with a larger poster board or something last year because whatever I bought did fit right around the bowl?! This year I’m making a version of this costume again–crazy purple minions this time. And just like you said, my poster board was too short. I had to attach an extra strip, too. I will adjust the directions up above when I get a second… thanks! Glad it worked out in the end, and sorry for the extra trip to the store!
Omgosh please please help!! I love this costume but I can not figure out these straps. I have trick or treat in 2 days. Ugh….can you please tell me how these straps go on?
Oh no! Okay, you want each strap to be taped to the chest area (like over your heart) and then taped in the back where the shoulder blade is–do that on both sides. (Imagine if you had straps across your own shoulders, and how they would need to sit.) So you want to place the tape on each side of the arm hole on the inside. I know it’s confusing. :( Maybe you can have your child try it on, too, and then peek inside and see if you can eyeball where the straps should go. If you’re still having trouble, try taping it lightly, and then have your child try it on over and over until you can see that the straps are correct–and then secure it well with duct tape once you’re good! If you find that the straps are sliding down (and peeking out the armholes), you can also pull the straps together in the back and wrap tape around them to keep them joined. The “bundle of tape” would then be at the center of your child’s back. I hope all that makes sense!! Good luck and happy trick or treating!
Sooo much more sense! I’m going to try this again. Lol Thank you so much! My son LOVES this costume. You are very talented and I thank you for sharing this with me. Your right it did only cost me almost $15 to make. Awesome!! :p
Yay! So glad! It really is a fun costume for very little $. Happy Halloween!
Please post pics and updates on your purple minons. My kids were begging for those but I wasn’t about to attempt them. Thanks for the above instructions kids are so excited.
Hi Angela! I will definitely post the how-to next fall. Right now I’m still trying to finish them! (If I never see another can of purple spray paint…) I’m basically following the same steps as above with the exception of the hair–I’m using the stretchy spider web stuff, and I sprayed it purple. I hope they turn out! I’m sure I will share a picture on my blog’s Facebook page when all is said and done if you follow me there! :)
Will this fit a 10 year old? I’m making this for my daughter, I see the circumference of the bowl is only 12 inches, I’m concern that it won’t fit her, she is 5 feet 100lbs.
Hi Sammy! I just finished a version of this costume for my (almost) 11-year-old daughter today (my girls are crazy purple Minions this year!), and she seems to have a similar build to your daughter. It should fit her, but it’s just a bit trickier to work the poster board. I used 1 3/4 poster boards (taped together to make it longer), and then I taped it to the outside of the bowl as “large” as I could to give it more room. And then when I taped the poster board closed to complete the circle and “close up” the body of the Minion, I left the bottom portion wider than the top (where the bowl is). It’s not a perfect cylinder that way, but it’s not too bad. When I added the “clothing” to the Minion, I had the fabric hang way down past the poster board. Because she’s taller, the poster board only went as far as her midsection, but with the clothing hanging way past the poster board, you have the illusion that the costume is bigger. I hope that makes sense. You could also try to find a wider bowl perhaps if you have concerns about it fitting? A reader told me she followed my tutorial but used a collapsible hamper for the body! I thought that was really smart. So maybe you could even come up a slightly different way to work things if necessary. Good luck if you give it a go! :)
We had 7 minions in our neighborhood, along with a Lucy and Gru. We moms had some good bonding over the creation of the costumes and so appreciated your directions and pictures. We are hoping it won’t be too cold here in MN on Thursday because our arm holes won’t allow for many extra layers!
So fun to read that, Alison!! LOVE IT! :) I trick-or-treated as a kid in MN many times in snow, so I will keep my fingers crossed for you guys up there! Happy Halloween, and thanks for taking a second to drop me this nice note!
Just wanted to say THANK YOU for posting this tutorial! I made them for my quintuplets and they turned out ADORABLE! I had 4 yellow and 1 purple minions… Received SO many complements!!! Couldn’t have done it without this post! Thanks again!
Ellen
You’re so welcome! I’m very impressed that you made FIVE of these! I can imagine you got some awesome pictures of your crew!! Happy Halloween! Thanks for the fun note. :)
Thank you for the directions. I made this for my thirteen year old son. I used 2 pieces of yellow poster board for the body. I could not find a cheap bowl the correct size so I used a punch bowl, covered it in foil and paper mached the rounded top. I had old denim drapes I was able to use for the overalls. I printed off the logo and the eye online. It turned out fantastic. Your directions were a great help. I spent $3 on the materials I needed to make the costume.
Love hearing how you modified the costume to make it work… and spending only $3! You can’t beat that! :) So glad it worked out for you. Thanks for the note. Happy Halloween!!
Hi, I just wanted to say a big THANK YOU for posting these instructions. My kids wanted to be minions this year and I’m not crafty at all, but the store bought costumes seemed so generic looking that I decided to take this on. (After a google search you had me at “easy” and “no-sew”) I had a really hard time trying to figure out the straps too and then I came up with an idea.. I just shoved a small throw pillow up in the bowl which worked perfectly for lining up their eyes with the mouth hole and made it super comfy and warm too. The costumes were a huge hit and my boys loved them! Everyone did.. I can’t tell you how many people stopped us to take pictures while trick or treating. I could have never come up with something like this on my own, but your instructions made it possible even for the craft-challenged. :-) Thanks again!!
Jen, that’s awesome! Love the pillow idea–so smart! The shoulder straps are definitely tricky. LOL about “you had me at ‘easy’ and ‘no sew’… you sound like my kind of girl!! :) Thanks so much for taking a second to drop me a note. My girls were crazy purple minions this year, so you can check back next fall for THAT tutorial… ha!
how wonderful!
I am preparing to be a mom in the coming year ,and checking your blog from Beijing really brings me joy and inspiration
thanks a lot!
keep blogging~
You are so sweet to leave me such a nice message–thank you! Best of luck as you become a mom! Life will never be the same again from that first day you hold your little one in your arms. So exciting! Take care! :)
Thank you so much for your instructions. We have realised the french version for our son !!
Thanks again
Viviane
So fun to hear that! Thanks for the note, Viviane! :)
sooo great! this costumes are awesome!! :-)
can’t wait for the next costume party
greetings from germany,
josi
Josi, so fun to receive your “hello” from Germany! :) I hope the costumes are a hit!
Thanks so much for the tutorial! I made a version of your minions for my kiddos, which they wore in a parade last weekend. They were a HUGE hit. Lots of people took their picture and yelled “Minions!” as they walked the route. My kids loved it! The hardest part for me? Finding an appropriate bowl for the head! Thanks again for taking the time to put the tutorial together and for providing such clear instructions.
Thank you so much for sharing this! Halloween is not such a big thing in Switzerland but we have “Fasnacht” (carnival). I was looking for a Minion costume and thanks to you I found one! :) My second graders and I will be the coolest MInions in February 2015.
Thanks a lot, Alessandra
what kindof poster board cause i tried like like a cardboard one and theres alot of lines and crap yours looks perfect :(
You are a doll! I can’t thank you enough for posting such a detailed, step by step set of directions! My 6 yr old daughter LOVES minions! She wants to be the one eyed minion for Halloween. I’ve been searching for wks at thrift stores for overalls and can’t find anything! I came across your no sew directions and did a happy dance! You rock girl! I can’t wait to buy the supplies and get started. Originally, I bought a round top garbage can to wrap in a camping pad. Then I was gonna wrap yellow felt/fleece around it. I saw it in Pinterest. I personally think it will be too heavy and it will get really hot in there at the 2 Halloween parties she has to attend. I think your idea will weigh less and not be as hot indoors. I can’t thank you enough!
Hi, I just wanted to thank you for saving me from breaking my 12 year old daughters heart this halloween. she is Minions mad ans wanted to be one this year but we couldnt find a cheap minion coustume hear in Scotland. so when I found your website I could have cried with joy lol. I found it hard to find poster board but luckily we had just bought a new hoover and I realised the box was perfect for the body and after weeks of looking for a big enough bowl I finally found a large plastic mixing bowl. I bought a large sized stretchy denim skirt which fitted around the body perfect and with the extra from the lenth I cut out the top bib and straps and glued to the body. I have drawn different styles of the single eye so my daughter can change it for all the different Halloween parties she is attending. I have always made my kids Halloween coustumes and they always win a prize so I am sure this year wont be any different. so thanks again for being my minion fairy godmother.
How did your kids do with all the fumes from the spray paint? I painted our bowls outside one week ago, stuck them in our basement storage room, and I can still smell the fumes from behind closed doors!! I am so bummed. I love this costume, but I am afraid to let my kids breathe in those vapors.
Hi Grace! I never noticed the paint fumes being an issue. Perhaps you could air them out outside for a bit before wearing? You could always make the mouth opening larger to give them more fresh air coming in to breathe, too. Sorry if it didn’t work out for you!!
very nice ideas
Just wanted to let you know I made my son & grandson, ages 4 years/6 months apart, the costumes. EVERY ONE complimented me on them! Every time we passed by other trick or treaters we heard, “Oh my God! They are minions!” “Wow! I think those are homemade! ” “I want one of those!” Lol We heard so many people talking about the costumes. Made me feel good that I heard so many compliments. You gave GREAT directions. THANKS SO MUCH!!!
Hi, I would just like to thank you for your helpful and fun blog and postings! I know this posting is from some time ago but I remembered seeing it a long time ago. And after searching hundreds of similar postings and directions this one is still in the front! I used your directions mixed with ideas I had based on the materials I found around the house. Plus we had a costume contest and I am a bit competitive (; My son is just three, so I figured this is possibly the last year I will get to choose his costume for him, I love the idea of a minion costume. Plus I get to wear a white coat and carry around a syringe (large plastic, no needle) holding purple jello (; Plus he loves attention and being told how cute he is (like his mom I guess… Haha). So anyways, I used the posterboard for the body, since since my son is shorter it worked out great. I covered the bowl and body with yellow felt (fabric store $2.39) and I used the pipe cleaners for hair which was great cause I had in my craft box already, plus it made the hair stick up. I used his bike helmet so I could buckel on to his head which I secured to a pillow which finally I secured to the bowl, all of which I owned already. The shoulder straps were tricky since he is young and is not quite able to shimmy/wiggle out at all, so I used your idea of socks, I used mens dress socks so they would be longer. I secured one on each side of the chest, then together in the back, at about the center of the shoulder blades, WORKED AWESOME!!! The buttons, thank you for your painting idea! I could not find large black ones, sometimes I totally forget about spray paint! And yes totally addictive, I couldn’t help but spray paint his shirt and gloves so they were all the same color yellow! I cut the symbol for the overalls out opposite of how you did it so that I had a stencil I could also spray paint. I ended up cutting out and glue/taping full overalls instead of him wearing his own jeans… But I glued velcro down the back of the overalls so I could slip him in and out easier, kind of like those one piece PJs that zip or button. I left the jeans long so it was easlier for me to lift the costume and lower over his head, they bunched at the ankle while wearing them. He had step in and bend over, fortunately he worked with me (: If I can recommend one thing, if you will be buying the blue fabric, and especially if making it longer past the body of the costume, use a stretchy blue material, I purchased thin stretchy denim (only $8.47 at fabric store) and it worked awesome!! I tried felt like material first and it was difficult to get in and out and secure in the back. The eyes and teeth were the easiest part!! Haha… I cut them out of cheap foam bord from craft store ($0.50 each 18×12 sheet) And for the goggles, I did them just how you did it! I was not trying to mess with that! So all in all the costume turned out so great! I have been making costumes since college (about 20 years) And this one was the favorite amongst family and friends. Without your ideas the costume would have been heavy, too warm, expensive, possibly a failure, and extremely time consuming!! I will always look for your costume ideas now that I’m making them for my son (: In the end it was fun, my little man loved it and got plenty of compliments, it was simple (only took me one night), and CHEAPER THAN BUYING PRE-MADE (less than $13.00)!! It was perfect, thank you so much, and thank you to readers as well for all the awesome ideas!! Never stop!
Just wanted to say: great job! Super creative! :) Thanks for sharing the tutorial.
Many thanks to you. My little boy won first place with his minion costume I made from your site. I got sooo many compliments. Thank you again the ones for sale in the stores just don’t compare
We made this minion costume for my 7-year old son this year, and it was a HUGE success! Thank you!
Thank you for your directions and step by step guide with pictures. I made 3 yellow minions and 2 purple minions. But I did paper mâché one of the minions head because I needed something bigger for my husbands costume! It was so much fun making these and we had a blast. My husband and I even won a costume contest. Thanks once again!!!
Thanks for the great tutorial! I found this site when I was searching for a fun no-sew costume for my eight year old son. I followed almost every single step you suggested. I did find yellow poster board (had to use two sheets) and used a plain cardboard bowl from a craft store, covered in duct tape, for the goggle. For the overalls buttons and G logo I used black foam board with a sticky back. The costume came out just like your photos. We went to several trick or treat events and it was the absolute talk of each one. People were shouting “minion!” everywhere we went. We received tons of compliments and were even stopped by a stranger to pose for a photo. This one will be tough to top next year! My son is already asking me to make a purple minion costume :)
I’m rather late in commenting…. but better late than never
If you are going to spray paint plastic (i.e. the bowl) make sure to use KRYLON FUSION for PLASTICS
this way you only ckean the bowl before spraying it
Do you think this could work for an adult? I need to make one for me and I’m a grown up! :-)
Definitely need more paper LOL
Yes, I think so!! Just use more paper. It can definitely work if you get creative. Go for it! :)