
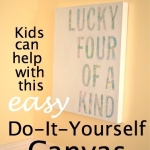
I think this is such a fun, simple idea! Using the wording “Best _____ Ever… Hands Down!” works for anybody! I actually made this as a Christmas gift for my youngest daughter to give to her three older sisters (to help them all remember the baby’s first Christmas), but I think something similar would work perfectly for Mother’s Day, Father’s Day, a birthday, or any other special day as well.
I used a picture for the gift that I made, but I actually first got the idea when I saw something pinned on Pinterest that originated here where they used no picture; they just printed the words “Best Dad, Hands Down!” on cardstock and then stamped two cute hands upside down. There are so many ways you could do this: print and frame cardstock; use a picture like I did; paint on wood; use a canvas; etc.
I wasn’t actually sure how my project was going to come together, but it worked out pretty well in the end, I thought! I bought a frame at Target with a slot for a picture that was off-center (toward the top), so I would have plenty of room to stamp my daughter’s hands under the picture. I thought about writing the words free-hand, but I was afraid I would be kicking myself afterward if I messed up or if things were really crooked or off-center, so I tried printing the words on translucent paper. I was going to attempt to just tape the translucent paper to the matting, but that looked terrible, so ultimately I transferred the words by hand. I really didn’t know what I was doing, but it worked out just fine–it was easy! :)
See below for details on my method…

You can see that I printed my wording in different colors on translucent paper (I used Mountains of Christmas font–my favorite whimsical font!). Since my paper was shorter than the matting, I didn’t like how you could see the edges–it was obvious that the letters were not printed right on the matting itself. So I ended up transferring the lettering to the matting.

I took the paper and lined up the wording until it was centered and straight to my liking, and then I taped it down (at the top only) to keep it in place. I then started tracing the letters while pushing really hard with a pencil. I was trying to make an impression of the letters on the matting.

When I flipped the paper up, I could see where I had pressed the pencil if I looked closely. I then lightly traced the indentations so now the letters were right on the matting.

All the words are now right on the matting, and they are straight, neat, and perfectly centered!

Next I just traced the letters with markers.
* I thought the markers (I used Sharpies) would completely hide the pencil marks, but you could still see the lead underneath the marker, especially under the lighter colors. Next time I would trace the letters with the pencil even more lightly to hide the lead a bit more completely.

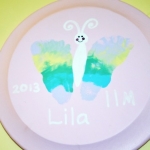
In the end, I decided to paint the silver frame yellow. It seemed to suit the style of the project better since it was girly and had so much color. Then all I had to do was stamp the baby’s hands, pop in the picture I had chosen, and that was it!
My daughter’s three big sisters loved it, and they were all smiles when they opened it. (They think the sun rises and sets with that baby, after all!) I think a gift like this is a sweet, personal, simple gesture that anyone would love! You could even do something with multiple handprints (from all the kids) for a parent or grandparent–or even for a teacher with handprints from the entire class! (For example, you could have the kids stamp their hands on a picnic blanket, a pop-up summer chair, or anything else you can think of!) Lots of ideas…


I hope this little project got your wheels turning a bit!
I’d love to know what handprint art ideas you have! :)


Very cute! I think I might have my 2 1/2-year-old do this for his nearly 6-year-old brother for Christmas.