
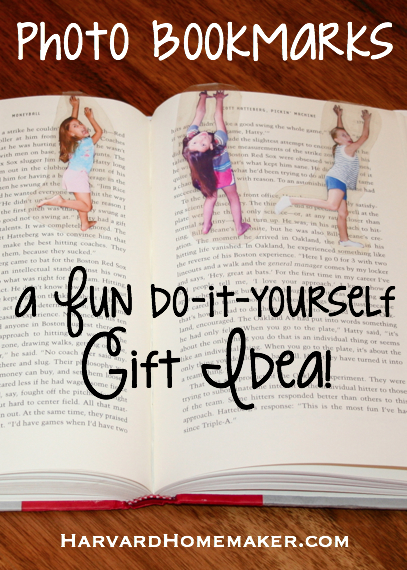
I think this idea to make photo bookmarks is so fun! I first saw it here where the kids were made to look like they were hanging from a rope inside the book. I loved that, but I decided to put my own spin on these. One of my girls will only use her favorite bookmark with magnets on it. She folds it over the top of the page, and then it snaps together, staying put. So if she tosses her book into her backpack, or if her baby sister pulls it down off her nightstand, for example, she still won’t lose her place because the bookmark won’t easily slide out. That functionality inspired the bookmarks you see here. We decided to create these as Father’s Day gifts, but they’d make a great gift for any occasion! If you were the recipient of one of these, I think you’d smile each time you used it!
See below for the step-by-step… pretty simple!

I had my four daughters pose as if they were hanging off a ledge. They thought it was hysterical, and as you can see, they really got into their poses. As for the baby, we held her favorite Elmo toy over her head to get her to hold up her arms. :)
I then uploaded the pictures onto my computer and printed them out on photo paper.

Next I carefully cut around their images using this scissors. I know you can find special “craft” scissors for fine cutting, but this was good enough for me!

I don’t have a laminating machine, so I used some of these self-laminating sheets. I actually had a few left over from a previous project, so I was all set.

I was going to attempt to laminate everything at once, but the sheets were so sticky that I didn’t have good control over what I was doing… things slid around a little bit, so I had to do two more silhouettes separately.

Since I only had two more silhouettes to laminate, I didn’t want to waste an entire sheet. I just cut the sheet down to size before laminating. That worked really well, and it was much easier to control. If I did this again, I might cut the sheets into strips and then laminate one or two images at a time.

Next I cut the photos apart.

I made sure that I left some space around the image so the picture was sealed completely inside.

For our bookmarks, I decided to pair up my daughters so one would be on one side of the page, and then another would be on the back side of the page. You could also use a blank piece of cardstock for the backside if you don’t want to link up two photos as shown here.

I ended up using a single piece of packing tape (cut small and thin) to hold the two images together. When I tried to reinforce it with another piece of tape on the reverse side, it wouldn’t fold naturally.

You can see here how the two sides will fold over the page in the book.

In order to make the bookmark less likely to slip out of the book, I took some photo adhesive magnets (cut to size) and then stuck them on the back of each photo as shown below. When the bookmark is folded over the page, then, the magnets will snap together.

Finally, I had my daughters write some notes on the back of the bookmarks with Sharpies. I was afraid the writing might rub off, but it seems pretty set to me. Of course you could write on the paper before it’s laminated, but I wasn’t sure where the magnets would be placed (thus, blocking the writing), and I also didn’t want the ink to seep through the paper for fear that you’d be able to see it on the faces of the girls on the flip-side.

Here’s a bookmark in action! How can you not smile at that?!

If you turn the page over, this is the other side of the bookmark.

A glimpse at the other bookmark…

Turn the page and view the reverse side!

I must say that I think these bookmarks are pretty entertaining!! An easy and creative way to wish someone well on Father’s Day or any day!

Like this idea?
If so, please pin the image below to share it with your friends!
Thanks for spreading the word! :)
Click here to check out another kid-friendly DIY gift (using handprints). For even more gift ideas, I have also compiled a list of 100 great books for all ages (and genders); 20 Thoughtful and Creative Gifts for Her; 20 Unique Gifts for Guys; and a list of gift ideas for the love of your life (for an anniversary, wedding, Valentine’s Day, birthday, etc.) I hope these posts will be helpful to you in some way!
Happy Father’s Day to all the guys out there… grandfathers, fathers, and sons!
If you’d like to keep up with me and my blog (I’d love that!), please follow along via Facebook, Pinterest, Twitter, Instagram, Google+, or you can sign up for my monthly newsletter in the footer of my site! :)


Thanks for the magnet idea….I will use it for my grandchildren….